forest succession activity.pdf

Forest Succession Activity: A Comprehensive Overview

This section provides an introduction to forest succession activities. These activities offer engaging methods for students to grasp the dynamic nature of ecosystems and the processes involved.

Ecological succession describes the gradual process of change in an ecosystem’s species structure over time. This process involves the replacement of one community of organisms by another until a stable state is achieved. These changes can occur due to natural disturbances like fires or windstorms, or human activities such as timber harvesting. Succession is a fundamental concept in ecology.

Understanding succession is crucial for comprehending how ecosystems respond to alterations and maintain equilibrium. Activities designed to simulate succession help students visualize these complex interactions. For instance, role-playing different tree species demonstrates the competitive dynamics within a forest. Such activities could be used as pre-lesson tools, illustrative examples, or post-lesson reinforcements, providing a comprehensive grasp of ecological principles.

The rate of succession is affected by various factors, highlighting the interconnectedness of ecological processes.

Defining Ecological Succession

Ecological succession is defined as the progressive and predictable sequence of changes in the composition of a community over time. This process involves the colonization of new habitats or the re-colonization of disturbed habitats by different species. These species modify the environment, creating conditions suitable for subsequent species. Succession leads to a more complex and stable ecosystem.

The stages of succession are characterized by specific plant and animal communities. Each stage prepares the way for the next, driven by changing environmental conditions. Activities that simulate these stages, such as modeling forest recovery after a fire, can provide hands-on learning. This helps students understand how ecosystems evolve and adapt.

Understanding ecological succession is essential for managing and conserving natural resources. Recognizing the factors that influence succession allows for informed decisions about land use and restoration efforts.

The Importance of Succession in Ecosystems

Ecological succession plays a vital role in maintaining the health and stability of ecosystems. It ensures the continuous development and evolution of biological communities. Through succession, disturbed or newly formed habitats are gradually transformed into more complex and diverse environments. This process enhances the overall resilience of ecosystems to environmental changes and disturbances.

Succession leads to increased biodiversity, providing a wider range of habitats and resources for various organisms. As ecosystems mature through succession, they become more efficient at nutrient cycling and energy flow. Understanding the importance of succession is crucial for effective ecosystem management and conservation efforts.

Activities demonstrating succession help students appreciate the interconnectedness of species and their environment. These activities highlight the role of each species in shaping the ecosystem over time. Recognizing the importance of succession promotes a deeper understanding of ecological processes and the need for sustainable practices.

Types of Forest Succession

Forest succession occurs in distinct forms, primarily primary and secondary. Understanding these types is crucial for comprehending forest ecosystem development and dynamics after disturbances, whether natural or human-induced.

Primary Succession: Definition and Examples

Primary succession initiates in lifeless areas, lacking soil. It’s the ecological process where life colonizes previously uninhabited environments. This occurs on bare rock surfaces, newly formed volcanic islands, or areas exposed by glacial retreat. The process begins with pioneer species like lichens and mosses. These organisms break down rock, initiating soil formation.

As pioneer species alter the environment, they pave the way for more complex plant communities. Small plants and grasses establish themselves. Over time, shrubs and trees take root. This gradual change leads to a more diverse and stable ecosystem. Primary succession is a slow process, often spanning centuries.

Examples include the formation of forests on volcanic lava flows, where bare rock gradually transforms into fertile ground supporting diverse flora and fauna. The development of vegetation on glacial moraines is another example. These examples highlight the resilience of life and its capacity to colonize and transform barren landscapes over extended periods.

Secondary Succession: Definition and Examples

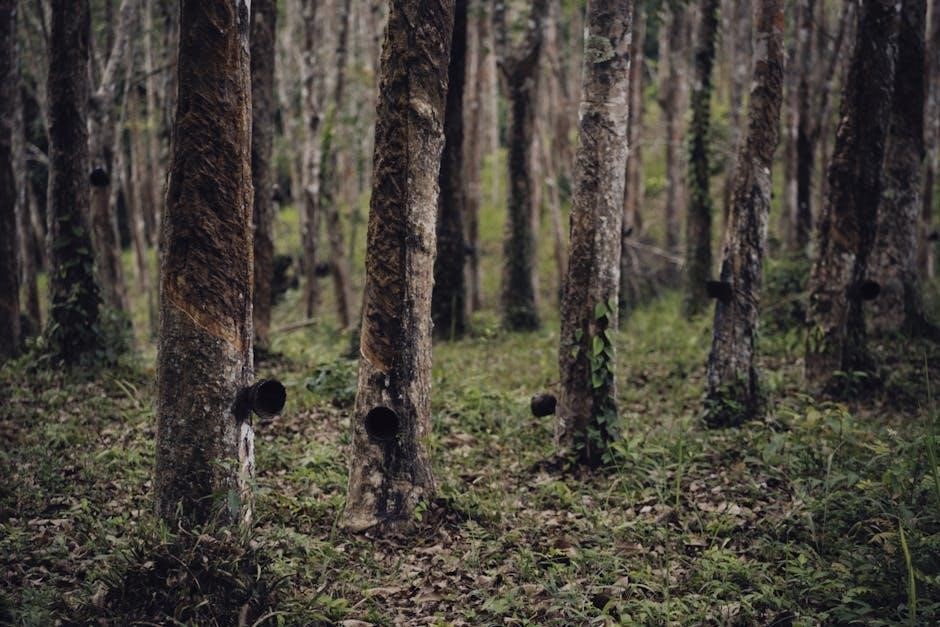
Secondary succession occurs in areas where existing ecosystems have been disturbed or destroyed. Unlike primary succession, soil is already present. This allows for a quicker re-establishment of plant life. Disturbances such as forest fires, floods, or human activities like logging initiate secondary succession.

The process begins with the emergence of pioneer species, often grasses and fast-growing plants. These species rapidly colonize the disturbed area. As the environment changes, different plant communities establish themselves. Shrubs and small trees gradually replace the initial vegetation. Eventually, a forest ecosystem may regenerate.
An example of secondary succession is the regrowth of a forest after a fire; The charred landscape is quickly colonized by grasses and other herbaceous plants. Over time, trees begin to grow, and the forest regenerates. Abandoned agricultural land is another example. Fields left unattended undergo secondary succession, transforming into grasslands and eventually woodlands. Human activities, like timber harvesting, can trigger secondary succession in coastal rainforests.

Distinguishing Primary and Secondary Succession

Primary and secondary succession are distinct ecological processes. They differ primarily in the initial conditions of the environment. Primary succession occurs in barren areas devoid of soil, such as newly formed volcanic rock or glacial deposits. The establishment of life begins from scratch, with pioneer species like lichens and mosses breaking down rock to form soil.

In contrast, secondary succession takes place in areas where soil already exists. These areas have experienced a disturbance that has removed or altered the existing vegetation. Examples include forests after fires, abandoned agricultural lands, or areas affected by floods.

The presence of soil in secondary succession allows for a faster recovery of plant life. Pioneer species in secondary succession are typically grasses and fast-growing plants that readily colonize disturbed areas. Primary succession, on the other hand, requires a much longer time frame due to the need for soil formation before plant life can establish itself. Thus, the key difference lies in the starting conditions and the rate of ecological change.

Similarities Between Primary and Secondary Succession

Despite their differences in starting conditions, primary and secondary succession share fundamental similarities. Both processes involve a series of predictable stages. These stages lead to the gradual development of a more complex and stable community. In both types of succession, pioneer species colonize the area initially, modifying the environment to make it suitable for subsequent species.

Over time, the species composition changes. Early colonizers are replaced by intermediate species, eventually leading to a climax community. This climax community is characterized by species that are well-adapted to the environment. These species can persist for long periods. The driving force behind both primary and secondary succession is ecological change. This change is driven by interactions between organisms and their environment.

Furthermore, both processes are influenced by factors like climate, disturbances, and species interactions. Ultimately, both primary and secondary succession demonstrate the resilience and dynamic nature of ecosystems. These ecosystems are constantly evolving towards a state of equilibrium.

Factors Influencing Forest Succession

Several factors influence the trajectory and rate of forest succession. These include natural disturbances like fire and climate, as well as human activities impacting ecosystems.

Role of Fire in Forest Succession

Fire plays a significant role in many forest ecosystems, acting as a crucial disturbance factor that shapes the process of ecological succession. In some forests, fire is a frequent and natural occurrence, influencing the composition and structure of the plant communities.

Following a fire, the landscape undergoes a series of changes as different species colonize the burned area. Some plant species are adapted to fire, possessing traits that allow them to survive or even thrive in its aftermath. These adaptations can include thick bark that protects them from the heat, or seeds that require fire to germinate.

The intensity and frequency of fires can also influence the successional pathway. High-intensity fires may remove most of the existing vegetation, creating opportunities for early-successional species to establish. Lower-intensity fires may only affect the understory, allowing mature trees to survive and influence the subsequent succession.

In some ecosystems, fire suppression can lead to a build-up of fuel, increasing the risk of more severe and destructive fires. Therefore, understanding the role of fire in forest succession is essential for effective forest management and conservation.

Impact of Climate on Forest Succession

Climate exerts a profound influence on forest succession, shaping the distribution, growth, and survival of plant species. Temperature, precipitation, and sunlight availability are key climatic factors that determine which species can thrive in a particular region.

Changes in climate, such as increasing temperatures or altered precipitation patterns, can have significant impacts on forest succession. As climate changes, some species may become less competitive, while others may find new opportunities to expand their range.

For example, a shift towards warmer and drier conditions may favor drought-tolerant species, while species that require cooler and wetter conditions may decline. These changes in species composition can alter the trajectory of forest succession, leading to different types of forest communities.

Furthermore, climate change can increase the frequency and intensity of disturbances such as wildfires, insect outbreaks, and extreme weather events, which can further disrupt forest succession. Understanding the complex interactions between climate and forest succession is crucial for predicting and mitigating the impacts of climate change on forest ecosystems.

Influence of Human Activities on Forest Succession

Human activities significantly influence forest succession, often disrupting natural processes and altering the trajectory of forest development. Timber harvesting, for example, is a major driver of secondary succession in many coastal rainforests, removing mature trees and creating opportunities for new growth.

Even seemingly benign activities, like grass mowing, can deflect succession by preventing the establishment of woody plants and maintaining a grassland community. Fire suppression, while intended to protect forests, can also disrupt natural fire regimes and alter successional pathways.

Understanding the ways in which human activities influence forest succession is essential for developing effective conservation and management strategies that promote forest health and resilience. Sustainable forestry practices, habitat restoration efforts, and careful land-use planning can help mitigate the negative impacts of human activities on forest ecosystems.

Forest Succession Activity: Educational Applications

Forest succession activities provide valuable educational opportunities. They introduce ecological concepts, simulate real-world processes, and serve as pre-lesson tools, illustrative aids, and explorations of deflected succession within climax communities.

Using Forest Succession Activities in the Classroom

Integrating forest succession activities into the classroom environment offers a dynamic approach to learning. Students can actively engage with ecological concepts, fostering a deeper understanding of ecosystem dynamics. These activities provide hands-on experiences that complement traditional lectures and textbook readings, making the learning process more interactive and memorable.

A key benefit is the ability to visualize abstract concepts such as species replacement and environmental change. Activities can range from simple simulations to complex role-playing scenarios, catering to diverse learning styles. By participating, students develop critical thinking skills, problem-solving abilities, and a greater appreciation for the interconnectedness of living organisms within a forest ecosystem.

Furthermore, classroom activities promote collaboration and teamwork as students work together to model and analyze succession processes. This collaborative environment encourages students to share ideas, discuss findings, and construct knowledge collectively. Forest succession activities transform the classroom into an engaging and stimulating learning space.

Simulating Forest Succession Through Role-Playing

Role-playing offers a highly engaging method to simulate forest succession. Students embody different tree species, acting out their roles in the changing ecosystem. This active participation enhances understanding of species interactions and environmental factors driving succession.

In a role-playing scenario, students research and portray the characteristics of various tree species, such as pioneer species like grasses and shrubs, or climax species like mature oaks; They then interact within a simulated environment, responding to changes like fire or climate shifts. This immersive experience allows students to visualize the dynamic processes of succession and witness how different species compete and adapt over time.

Furthermore, role-playing promotes critical thinking as students analyze the impact of disturbances and management activities on the forest. It encourages collaborative problem-solving as students work together to maintain a healthy and diverse forest ecosystem. Through role-playing, forest succession becomes a living, breathing concept.

Forest Succession as a Pre-Lesson Activity

Forest succession activities serve as excellent pre-lesson introductions, sparking curiosity and laying a foundation for deeper understanding. By engaging students with hands-on experiences before formal instruction, educators can prime their minds for the complexities of ecological change.

These activities can range from simple card-sorting exercises, where students arrange species cards in the order of succession, to interactive simulations that visually demonstrate the progression of a forest over time. Such activities help students to explore initial concepts and questions about succession, encouraging them to actively seek answers during subsequent lessons. This proactive approach fosters a sense of ownership over their learning.

Using forest succession activities as a pre-lesson strategy also allows teachers to gauge students’ existing knowledge and identify any misconceptions. By observing student interactions and discussions, educators can tailor their lesson plans to address specific learning needs and ensure that all students are prepared to engage with the material effectively.

Forest Succession as an Illustrative Tool

Forest succession activities serve as a powerful illustrative tool, bringing abstract ecological concepts to life. Through engaging simulations and hands-on exercises, students can visualize the dynamic processes that shape forest ecosystems over time.

Activities like role-playing, where students embody different tree species competing for resources, or creating timelines of forest development after a disturbance, provide concrete examples of succession in action. These interactive methods allow students to experience the interconnectedness of species and the impact of environmental changes on community composition.

Furthermore, forest succession activities can effectively demonstrate the differences between primary and secondary succession, highlighting the role of soil development and the influence of prior disturbances. By observing the outcomes of these activities, students develop a deeper understanding of the factors that drive ecological change and the resilience of forest ecosystems. The experience transforms learning from passive listening to active participation.

Deflected Succession and Climax Communities

Deflected succession occurs when natural processes are interrupted, leading to an altered trajectory in ecological development. Human activities, such as mowing or timber harvesting, often cause this deflection, preventing an ecosystem from reaching its typical climax community. The climax community that ultimately develops under these circumstances is therefore different.

These activities create an environment that favors certain species over others, potentially leading to a simplified or less diverse ecosystem. For example, regular mowing prevents the establishment of trees and shrubs, maintaining a grassland instead of allowing a forest to develop.

Understanding deflected succession is crucial for effective conservation and management practices. By recognizing the factors that disrupt natural succession, we can develop strategies to minimize human impacts and promote the development of more resilient and diverse climax communities. The final stage differs from its natural counterpart because of continued artificial interference.

Posted in PDF

snap circuits jr manual

What is Snap Circuits Jr?

Snap Circuits Jr. is an award-winning educational toy designed to introduce children to the basics of electronics through hands-on learning; It consists of color-coded, snap-together components that simplify circuit building, making it accessible for young learners. The kit allows kids to create over 100 different projects, from simple circuits to more complex designs, fostering creativity and problem-solving skills. With its easy-to-follow, full-color manual, Snap Circuits Jr. provides a fun and engaging way for children to explore STEM concepts, sparking an early interest in science and technology. Its user-friendly design ensures safety and ease of use for beginners.

Who is it designed for?

Snap Circuits Jr. is specifically designed for children aged 8 and above, offering a fun and educational way to explore electronics and circuitry. It is ideal for young learners with an interest in STEM fields, providing a hands-on experience that fosters creativity and problem-solving skills. The kit is also a valuable tool for educators and parents seeking to introduce children to basic engineering and technology concepts. Its safety-focused design ensures that kids can experiment and learn without the risk of electrical shock, making it a perfect activity for both guided learning and independent play. It’s a great way to spark curiosity in young minds.

Components and Parts

The SC-100 kit includes 28 essential components, such as wires, switches, motors, and colorful snap-together parts. These pieces are designed for easy connection and safe experimentation, promoting creative learning.

Included Parts in the SC-100 Kit

The SC-100 kit comes with 28 components, including a variety of wires, switches, motors, and colorful snap-together parts. These pieces are designed for easy connection and safe experimentation, allowing children to build over 100 projects. The kit also features a full-color project manual, which guides users through each step of the process. Each part is labeled with symbols and colors to help users understand their functions, making it easier for kids to grasp basic circuitry concepts. The components are durable and reusable, encouraging creativity and repeated use. This variety of parts ensures a comprehensive introduction to electronics.

Understanding the Symbols and Colors

The Snap Circuits Jr. manual uses symbols and colors to simplify circuit building. Each component, such as wires, switches, and motors, is represented by distinct symbols, helping users identify their functions. Colors are used to differentiate parts, making connections more intuitive. For example, wires are often color-coded to indicate their purpose, while switches and motors may have specific icons. The manual includes a reference guide to explain these symbols and colors, ensuring users can easily understand and build circuits. This visual system is designed to make learning electronics accessible and engaging for children and beginners. It enhances the overall learning experience.

Safety Precautions

Always check wiring before activating circuits. Never leave circuits unattended with batteries installed. Follow instructions carefully to avoid short circuits or component damage. Ensure adult supervision for children.

General Safety Guidelines

To ensure safe and enjoyable use of Snap Circuits Jr., always follow these guidelines. Begin by carefully reading the manual and understanding each component’s purpose. Use components as instructed to avoid short circuits or damage. Keep the kit away from water and extreme temperatures. Never modify or tamper with parts, as this can lead to safety hazards. Ensure children are supervised by an adult during assembly and operation. Always disconnect batteries when not in use and store them properly. Avoid touching electrical contacts or wires with wet hands. Regularly inspect components for damage or wear and tear. Safety is key to a fun learning experience with Snap Circuits Jr.

WARNING: Key Safety Instructions

Always check your wiring before turning on a circuit to prevent short circuits or damage. Never leave a circuit unattended while batteries are installed. Use only the recommended batteries and avoid mixing old and new ones. Do not modify or tamper with components, as this can create fire or electrical hazards. Keep the kit away from water or moisture to prevent damage. Adult supervision is recommended for children during assembly and operation. Store components securely after use to avoid loss or accidental contact. Follow these warnings carefully to ensure safe use and optimal performance of your Snap Circuits Jr. kit.

Manual Overview

The Snap Circuits Jr. manual is a comprehensive, full-color guide with over 100 projects. It provides clear instructions, from simple circuits to complex creations, ensuring an engaging learning experience for kids and beginners alike.

Structure of the Project Manual

The Snap Circuits Jr. project manual is structured to guide users through a progressive learning experience. It begins with basic circuit assembly, gradually introducing more complex projects. Each project is accompanied by clear, step-by-step instructions and detailed color illustrations, ensuring that even young users can follow along easily. The manual is divided into sections, starting with essential safety guidelines and component identification before moving into hands-on activities. This logical progression helps build confidence and skills, making it an ideal resource for both children and educators seeking to teach fundamental electronics concepts in an engaging manner.

Navigating the Instructions

The Snap Circuits Jr. manual is designed to be user-friendly, with clear step-by-step instructions for each project. Each page features color-coded illustrations and symbols to help users identify components and connections. Projects are organized by difficulty, starting with simple circuits and progressing to more complex designs. The manual includes numbered instructions, making it easy to follow along. Visual guides and safety reminders are prominently displayed to ensure a smooth building experience. Users can quickly locate specific projects using the table of contents or index. The manual encourages experimentation and creativity while providing a structured path for learning electronics fundamentals.

Building Simple Circuits

Building simple circuits with Snap Circuits Jr. begins with step-by-step instructions, using color-coded parts. Start with basic connections, ensuring correct component placements. Always check wiring before activation, as instructed. Ideal for beginners, these projects build fundamental circuitry skills.

Step-by-Step Guide for Beginners

The Snap Circuits Jr. manual provides a clear, step-by-step guide for beginners. Start by identifying and organizing the color-coded components. Follow the project manual’s visual instructions, beginning with simple circuits like a basic light or buzzer. Ensure proper connections by matching snaps securely. Always check wiring before activating a circuit. Projects gradually increase in complexity, introducing new components like motors and switches. Troubleshoot by verifying connections and battery placement. Each project builds on previous skills, fostering a hands-on learning experience. This approach helps kids master basic circuitry concepts while encouraging creativity and problem-solving.

Understanding Basic Circuit Connections

A circuit is a complete path for electricity to flow. It requires a power source, conductors (wires), and a load (e.g., a light or buzzer). In Snap Circuits Jr., components are color-coded and snap together easily. Start by connecting a battery to a switch, then add a light bulb or other output device. Always ensure connections are secure and follow the manual’s visual guides. Experiment with different configurations to see how adding or removing components affects the circuit’s function. This hands-on approach helps kids grasp fundamental circuitry principles and builds a strong foundation for more complex projects. Practice makes understanding circuits intuitive and fun.

Advanced Projects and Experiments

Explore advanced projects like a glowing UFO, photo transistor, and motor. These challenging circuits deepen understanding of electronics and encourage creative problem-solving in young learners.

Creating Complex Circuits

As young inventors progress, they can tackle intricate designs like a glowing UFO or a photo transistor circuit. These advanced projects require careful planning and understanding of component interactions. By combining multiple parts such as motors, switches, and LEDs, kids can create functional devices that showcase their mastery of circuitry. The Snap Circuits Jr. SC-100 kit encourages experimentation, allowing children to troubleshoot and refine their designs. This process fosters critical thinking and creativity, preparing them for more complex STEM challenges. With patience and practice, budding engineers can bring their imaginative ideas to life, turning simple concepts into sophisticated electronic creations.

Examples of Over 100 Projects

The Snap Circuits Jr. SC-100 kit offers a wide variety of exciting projects, from simple circuits to intricate designs. Kids can build a glowing UFO, a photo transistor circuit, or even a motorized car. These projects introduce fundamental electronics concepts, such as conductivity, resistance, and circuit pathways. With over 100 possibilities, young creators can experiment with different combinations of the 28 included parts. The projects range in difficulty, allowing learners to progress from basic connections to more complex systems. Each completed project reinforces STEM principles, encouraging curiosity and innovation while making learning fun and interactive.

Troubleshooting Common Issues

When encountering issues with Snap Circuits Jr., start by checking connections. Ensure all components are securely snapped into place and aligned properly. If a circuit doesn’t work, verify that the correct parts are used for the project. Dead batteries or incorrect polarity can also cause malfunctions. Always check wiring before turning on a circuit and avoid leaving it unattended with batteries installed. For persistent problems, consult the manual or online resources for guidance. Regularly inspect parts for damage and ensure they are clean. By following these steps, users can quickly identify and resolve common issues, ensuring a smooth building experience.

Educational Value and STEM Connections

Snap Circuits Jr. offers exceptional educational value by introducing children to fundamental concepts of electronics and circuitry through hands-on learning. It aligns with STEM principles, fostering critical thinking, creativity, and problem-solving skills. By building circuits, kids gain an understanding of how electricity flows and how components interact. The kit encourages experimentation, allowing children to see the practical application of scientific concepts. It also enhances spatial reasoning and logical thinking. Perfect for budding inventors, Snap Circuits Jr. prepares young minds for advanced STEM studies and sparks an early interest in engineering and technology, making it a valuable tool for both education and fun.

Replacement Parts and Accessories

Replacement parts for Snap Circuits Jr. are readily available, ensuring longevity and continued exploration. Users can purchase individual components like switches, wires, and motors to replace lost or damaged items. Additionally, accessories such as extra project manuals and storage cases can enhance the overall experience. These accessories are designed to maintain organization and provide opportunities for expanded creativity. By offering replacement parts, Snap Circuits Jr. supports sustained learning and experimentation, allowing children to continue building and discovering without interruption. This feature underscores the product’s commitment to durability and adaptability, making it a long-term educational investment for young learners.

Maintenance and Storage Tips

Proper maintenance and storage are essential to prolong the life of Snap Circuits Jr. components. Regularly clean the parts with a soft cloth to remove dirt or debris. Store components in a dry, cool place to prevent corrosion. Use a sturdy storage case to keep pieces organized and avoid misplacement. Avoid bending or twisting wires excessively, as this can cause damage. Check batteries for corrosion and replace them as needed. Ensure all parts are securely stored to prevent loss. Following these tips ensures your Snap Circuits Jr. kit remains functional and ready for future projects, providing endless hours of creative learning.

Frequently Asked Questions (FAQ)

What age range is Snap Circuits Jr. suitable for? It is designed for children aged 8 and up. Can I purchase replacement parts? Yes, replacement parts are available for individual components. How many projects can I create? The kit supports over 100 unique projects. Is the manual easy to follow? The full-color manual is designed for beginners, with clear step-by-step instructions. Are the parts durable? Components are built to last with proper care. Can I combine sets? Yes, combining kits allows for even more complex circuits. Are batteries included? No, batteries are sold separately. How do I troubleshoot common issues? Refer to the troubleshooting section for guidance. This ensures a smooth and enjoyable learning experience for all users.

presser foot guide

Presser feet are essential for sewing, ensuring fabric stays flat and guides smoothly under the needle for precise stitching. Available in various types, they cater to specific sewing needs, enhancing accuracy and efficiency in every project.

What is a Presser Foot?

A presser foot is a detachable part of a sewing machine that holds fabric flat against the throat plate, guiding it smoothly under the needle. Its primary function is to ensure even feeding and prevent fabric from bunching or dragging. Also known as a patchwork foot, it is particularly useful for quilting, providing consistent seam allowances. By maintaining contact with the fabric, the presser foot enhances stitching accuracy and control, making it an indispensable tool for various sewing tasks, from general sewing to specialized techniques like free-motion quilting.

Why are Presser Feet Essential for Sewing?

Presser feet are vital for maintaining fabric control during sewing, ensuring even feeding and preventing dragging or bunching. They provide consistent contact with the fabric, which is crucial for accurate stitching and professional results. By keeping the fabric steady, presser feet minimize common issues like missed stitches or uneven seams. This makes them indispensable for achieving high-quality outcomes in quilting, patchwork, and other sewing tasks, enhancing both efficiency and precision for sewists of all skill levels.

Types of Presser Feet

Presser feet come in various types, each designed for specific sewing tasks. Common ones include quilting, darning, walking, and adjustable guide feet, catering to different fabrics and techniques.

1/4 Inch Quilting Foot

The 1/4 inch quilting foot, also known as a patchwork foot, is designed for precise seam allowances. It features a built-in guide that keeps fabric aligned, ensuring consistent 1/4-inch seams ideal for quilting and patchwork projects. This foot is especially useful for piecing together quilt blocks, where accuracy is crucial. Its narrow width allows for stitching close to the edge, making it perfect for delicate or intricate patterns. The foot’s design ensures smooth fabric feeding, reducing drag and preventing distortion, which is essential for maintaining the integrity of the fabric during quilting.

Darning Foot for Free-Motion Quilting

The darning foot is a versatile tool for free-motion quilting, allowing you to move fabric freely under the needle. It is ideal for creating intricate stitching patterns and designs. The open-toe design provides excellent visibility, making it easier to control stitching. This foot is particularly useful for quilting, embroidery, and repair work. It works well with low-shank sewing machines and is compatible with models like Brother, Babylock, and others. The darning foot does not have a built-in guide, giving you more control over stitch placement and direction, perfect for artistic sewing projects.

Walking Foot for Heavy Fabrics

The walking foot is designed for sewing heavy, thick, or slippery fabrics, such as denim, leather, or multiple layers. It features a unique mechanism that grips the fabric, moving it smoothly under the needle. This foot is ideal for handling stretch materials, reducing slippage and bunching. It is compatible with low-shank sewing machines, including Brother and Babylock models. The walking foot is perfect for quilting, upholstery, and sewing through challenging fabrics, ensuring even stitching and professional results. Its robust design makes it a must-have for heavy-duty sewing projects.

Adjustable Guide Presser Foot

The adjustable guide presser foot is a versatile tool designed to help sewists achieve precise fabric alignment. Its built-in guide can be adjusted to various widths, making it ideal for tasks like stitching in the ditch or creating straight, evenly spaced lines. This foot is particularly useful for quilting, home decor projects, and sewing straight lines on bulky fabrics. Compatible with low-shank machines, it fits models like Brother, Janome, and others. The adjustable guide ensures accuracy, making it a valuable addition to any sewing toolkit for consistent, professional results.

How to Use Presser Feet

Presser feet are crucial for controlling fabric movement, ensuring accurate stitching, and preventing slippage. They enhance sewing efficiency and precision, making them indispensable for various projects.

Using the 1/4 Inch Quilting Foot for Accurate Seams

The 1/4 inch quilting foot, also known as a patchwork foot, is designed for precise seam allowances. Its built-in guide ensures fabric stays aligned, making it ideal for quilting and piecing. The foot’s edge helps maintain consistent 1/4 inch seams, crucial for accurate block construction. It works well with straight-stitch sewing machines and is compatible with low-shank models from brands like Brother and Janome. This foot simplifies quilting projects, ensuring professional-quality results with minimal effort.

Mastering the Darning Foot for Low Shank Machines

The darning foot is ideal for free-motion quilting, allowing fabric to move freely under the needle. It is compatible with low shank machines like Brother, Babylock, and Janome. To use it effectively, lower the feed dogs and stabilize the fabric with tear-away stabilizer. This foot is perfect for creating smooth, even stitches in intricate designs. It is a must-have for quilters and embroiderers, offering precision and control for decorative stitching and quilting projects.

Guiding Fabric with the Adjustable Presser Foot

The adjustable guide presser foot is a versatile tool for precise fabric control, ideal for straight-line stitching and consistent seam allowances. Its built-in guide can be set to various widths, making it perfect for quilting, hemming, and edge stitching. Compatible with low shank machines like Brother and Babylock, it ensures fabric stays aligned without manual adjustment. This foot is a time-saver for projects requiring straight, even stitching, allowing you to focus on creativity while maintaining professional results. Use it for guided accuracy in your sewing projects.

Choosing the Right Presser Foot

Selecting the right presser foot enhances sewing results, ensuring compatibility with your machine and fabric type while meeting project-specific needs for optimal performance and precision.

Factors to Consider for Fabric and Project Type

When selecting a presser foot, consider the fabric weight, texture, and stretch. For delicate fabrics like silk or chiffon, choose a foot with a soft grip. Heavy fabrics such as denim or canvas benefit from a sturdy walking foot. For stretchy materials like knits, a Teflon foot or zigzag foot is ideal. Additionally, think about the project type—quilting requires a 1/4-inch quilting foot, while free-motion quilting demands a darning foot. Specialized feet like the adjustable guide foot are perfect for precise seams in home decor or bag-making projects. Always match the foot to your fabric and project needs for professional results.

Compatibility with Your Sewing Machine

Ensuring your presser foot is compatible with your sewing machine is crucial for optimal performance. Most feet are designed for specific machine types, such as low shank or high shank models. Check your machine’s manual to determine the correct presser foot type. Using an incompatible foot can lead to poor stitch quality or even damage your machine. Always verify compatibility before purchasing to ensure smooth sewing experiences.

Maintenance and Troubleshooting

Regularly clean presser feet to remove debris and ensure smooth fabric flow. Store them in a protective case to prevent damage. Address common issues like fabric dragging by inspecting for wear or misalignment, and adjust or replace as needed to maintain optimal sewing performance.

Cleaning and Storing Presser Feet

Regular cleaning of presser feet is crucial to remove debris and ensure smooth fabric flow. Use a soft brush or cloth to wipe away dust and thread fragments. For stubborn residue, dampen a cloth with water or mild detergent, but avoid harsh chemicals. After cleaning, store presser feet in a protective case or pouch to prevent scratches and damage. Keep them in a dry, cool place away from direct sunlight. Proper storage extends their lifespan and maintains their performance. Always inspect feet for wear during cleaning and replace them if necessary.

Common Issues and Solutions

Common issues with presser feet include improper fabric feeding, uneven stitching, or damage to the foot. If fabric doesn’t move smoothly, check that the foot is lowered correctly and pressure is adjusted. For skewed seams, ensure the foot is aligned with the edge of the fabric. If the foot is damaged or incompatible, replace it with the correct type. Using the wrong presser foot for the fabric or stitch type can also cause problems. Always refer to your machine’s guide for troubleshooting specific issues and solutions to maintain optimal performance.

Popular Presser Foot Sets

Ultimate Presser Foot Set offers 32 essential feet for diverse sewing tasks. Brother Action Guide Feet are designed for PQ Series machines, ensuring precision and versatility for quilting and more.

Ultimate Presser Foot Set ⎯ 32 Essential Feet

The Ultimate Presser Foot Set is a comprehensive collection of 32 essential feet designed to meet diverse sewing needs. This set includes specialized feet like the 1/4 inch quilting foot, adjustable guide foot, and darning foot, ensuring versatility for quilting, home decor, and garment construction. Compatible with low-shank machines such as Brother, Babylock, and Janome, this set offers a wide range of tools to enhance precision and creativity in every sewing project. Perfect for both beginners and experienced sewists, this set is a must-have for any sewing room.

Brother Action Guide Feet for PQ Series

Brother Action Guide Feet for the PQ Series are designed to enhance precision and control in quilting and patchwork projects. These feet feature an adjustable guide bar, allowing for consistent seam allowances and accurate fabric alignment. Ideal for low-shank machines, they are compatible with Brother sewing machines, ensuring smooth operation. The guide feet are perfect for stitching-in-the-ditch, edge stitching, and decorative seams, making them indispensable for quilters and sewists seeking professional results. Their versatility and ease of use make them a valuable addition to any sewing toolkit.

Presser feet are indispensable tools that elevate sewing projects to professional levels. From quilting to heavy-duty stitching, the right foot ensures accuracy, efficiency, and versatility. Whether you’re a beginner or an advanced sewer, understanding and utilizing these feet can transform your sewing experience. By choosing the right presser foot for your fabric and project, you unlock endless creative possibilities, making every stitch precise and every garment or quilt a masterpiece of craftsmanship.

snowboard helmet size guide

This guide helps you find the perfect snowboard helmet fit‚ ensuring safety and comfort. Learn about your head shape‚ sizing‚ and key factors for optimal protection.

Why Proper Helmet Fit Matters for Snowboarding

A properly fitting helmet is essential for both safety and performance on the slopes. It ensures optimal protection by distributing impact forces evenly‚ reducing the risk of head injuries. A snug fit prevents the helmet from shifting during falls‚ keeping it securely in place. Additionally‚ a well-fitting helmet enhances comfort‚ allowing riders to focus on their technique without distractions. Poor fit can lead to discomfort‚ reduced visibility‚ and increased risk of injury. Prioritizing a helmet that matches your head shape and size is crucial for maximizing safety and enjoying a seamless snowboarding experience. Proper fit is non-negotiable for every rider.

Overview of Helmet Sizing and Fit

Helmet sizing is determined by measuring head circumference‚ typically ranging from small to extra-large. Proper fit ensures the helmet sits level‚ with no tilting‚ and covers the forehead without obstructing vision. The fit should be snug but not tight‚ allowing room for layering like beanies or goggles. Most helmets feature adjustable systems for customization‚ such as dial-fit or padding adjustments. Understanding your head shape—whether round‚ oval‚ or elongated—helps in selecting a helmet that contours naturally. A well-fitting helmet balances comfort and protection‚ ensuring confidence and safety on the slopes. Sizing charts vary by brand‚ so always refer to specific guidelines when choosing.

How to Measure Your Head for a Snowboard Helmet

Measure your head circumference using a flexible tape measure around the widest part‚ just above the eyebrows and ears. Ensure a snug‚ level fit for accuracy.

Step-by-Step Guide to Measuring Head Circumference

To measure your head for a snowboard helmet‚ start by wrapping a flexible tape measure around the widest part of your head‚ just above your eyebrows and ears. Ensure the tape is level and not too tight or loose. This will give you an accurate circumference. Note the measurement in centimeters or inches. Next‚ refer to the helmet size chart to find your corresponding size. If your measurement falls between sizes‚ consider layering thickness to decide the best fit. Proper measurement ensures a safe and comfortable helmet fit. Always double-check your measurements for accuracy.

Understanding Head Shapes and Their Impact on Fit

Head shapes vary among individuals‚ with three main types: round‚ oval‚ and elongated. A round head is wider with a shorter front-to-back measurement‚ while an oval head is balanced with a slightly longer profile. An elongated head is narrower and longer. These differences affect how a helmet fits‚ as improper alignment can cause discomfort or gaps. Helmets are designed to accommodate these shapes‚ so understanding yours helps in selecting the right model. Try on helmets to ensure compatibility‚ as even slight variations can impact safety and comfort. Proper fit is crucial for optimal protection.

Key Factors Influencing Helmet Size

Head circumference‚ shape‚ and seasonal layering are crucial for determining the right helmet size. Proper fit ensures safety‚ comfort‚ and optimal performance during snowboarding activities.

Head Circumference vs. Helmet Size Charts

Accurate head circumference is essential for choosing the right helmet size. Measure around the widest part of your head‚ just above the eyebrows and ears. Use a flexible tape measure‚ ensuring it’s level and not too tight. Once you have your measurement‚ compare it to the helmet size chart provided by manufacturers. These charts typically range from Small to X-Large‚ with corresponding circumference measurements in centimeters or inches. Ensure your measurement falls within the recommended range for your chosen size to guarantee a proper fit. This step eliminates guesswork and ensures optimal safety and comfort.

Importance of Layering and Seasonal Adjustments

Layering and seasonal adjustments play a crucial role in ensuring a proper helmet fit. In colder months‚ thicker hats or additional layers under the helmet can increase head circumference‚ requiring a slightly larger size. Conversely‚ in warmer conditions‚ fewer layers may mean a snugger fit. Always consider the thickness of your winter gear when choosing a helmet size. Seasonal adjustments ensure the helmet remains comfortable and secure‚ regardless of the weather. A well-fitting helmet accommodates varying headgear while maintaining even pressure distribution for safety and comfort. Proper layering ensures your helmet stays comfortable and protective all year round.

How to Try On a Snowboard Helmet

Put on the helmet‚ ensuring it sits level and snug. Check goggles compatibility and adjust fit for even pressure without feeling too tight.

Checking the Fit: Snug but Not Too Tight

A properly fitting helmet should feel snug without causing discomfort or pressure points. When you try it on‚ ensure the helmet sits level and doesn’t tilt back. The front should align with your eyebrows‚ and the back should rest just above the neck. If the helmet feels too tight‚ it may cause headaches or restrict movement. Conversely‚ if it’s too loose‚ it won’t provide adequate protection. Adjust the fit using the dial or straps to achieve even pressure distribution. Always wear the helmet for a few minutes to ensure comfort and proper fit.

Ensuring Compatibility with Goggles

When choosing a snowboard helmet‚ compatibility with your goggles is crucial for both functionality and comfort. Look for helmets with built-in goggle clips or recessed areas designed to accommodate goggles. Ensure the helmet’s fit allows space for the goggles to sit snugly without compressing your forehead. Test the fit by wearing the goggles and helmet together to verify there’s no slipping or pressure points. Proper integration ensures clear vision‚ prevents fogging‚ and maintains a secure fit. Always check compatibility before purchasing to avoid discomfort or compromised performance on the slopes.

Signs of a Properly Fitting Helmet

A properly fitting helmet offers even pressure distribution‚ no gaps between the helmet and head‚ and stays securely in place when moving your head.

Even Pressure Distribution

Even pressure distribution is crucial for comfort and safety. A well-fitting helmet ensures the weight is spread uniformly around the head‚ avoiding hotspots. This balance prevents discomfort during long rides and ensures optimal protection by maintaining consistent contact. Proper distribution also helps in absorbing impacts more effectively‚ reducing the risk of injury. When trying on a helmet‚ check that it doesn’t feel too tight in one area or too loose in another. Adjust the fit system if necessary to achieve a balanced feel. Even pressure ensures your helmet stays comfortable and protective all day long.

No Gaps Between the Helmet and Head

A properly fitting helmet should have no gaps between the head and the interior. Gaps can compromise protection and cause discomfort. To ensure a snug fit‚ the helmet should sit evenly‚ hugging the contours of your head without shifting. When you move your head‚ the helmet should move with it. If there are noticeable spaces‚ especially around the temples or back‚ the helmet is too small or large. Proper fit ensures maximum safety and comfort‚ allowing you to focus on your snowboarding experience without distractions. Always check for gaps when trying on a helmet to ensure optimal protection.

Care and Maintenance for Your Snowboard Helmet

Proper care ensures your helmet remains protective and lasts longer. Clean it regularly with mild soap‚ avoid harsh chemicals‚ and store it in a dry place.

Cleaning and Storing Your Helmet

To maintain your helmet’s integrity‚ clean it with mild soap and water‚ avoiding harsh chemicals. Gently scrub removable padding and let it air dry. Store in a cool‚ dry place away from direct sunlight. This prevents damage from UV rays and moisture buildup. Regular cleaning ensures hygiene and longevity‚ while proper storage preserves the helmet’s shape and safety features; Always check for wear and tear after cleaning to ensure it remains safe for use. Proper care extends the life of your helmet and maintains its protective qualities.

When to Replace Your Helmet

Replace your helmet if it shows signs of wear‚ damage‚ or has been involved in an impact. Even minor crashes can compromise its structural integrity. Look for cracks‚ dents‚ or frayed padding. Helmets typically have a lifespan of 3-5 years‚ depending on usage and conditions. If you notice any deterioration‚ it’s time for a replacement. Regular inspections ensure your helmet remains reliable for protection. Always prioritize safety by investing in a new helmet when necessary. A damaged helmet may fail to provide adequate protection in future incidents‚ making replacement crucial for your safety on the slopes.

Common Mistakes to Avoid When Choosing a Helmet

Don’t sacrifice safety for style—prioritize proper fit and protection. Avoid ignoring safety features or compatibility with goggles. Always ensure a snug‚ comfortable fit for optimal safety.

Ignoring Proper Sizing for Aesthetics

Prioritizing a helmet’s appearance over proper fit is a common mistake. A stylish helmet that doesn’t fit correctly offers reduced protection and comfort. Ensure your helmet fits snugly‚ as poor sizing can lead to safety risks. While aesthetics are important‚ they should never compromise the primary purpose of the helmet—to protect your head. Always measure your head and try on helmets to ensure a secure fit before making a purchase. Remember‚ safety and comfort should always take precedence over design preferences.

Not Considering Additional Safety Features

When choosing a helmet‚ it’s crucial to look beyond size for enhanced safety. Features like MIPS technology‚ which reduces rotational force impact‚ can significantly improve protection. Integrated visors or goggle compatibility ensure clear vision‚ while adjustable vents provide temperature regulation. Some helmets also offer audio compatibility‚ allowing you to listen to music without compromising safety. Overlooking these features might leave you with a less protective or less comfortable helmet. Always assess additional safety and functional features to ensure your helmet meets your needs for both safety and performance on the slopes.

A well-fitting helmet ensures safety‚ comfort‚ and confidence on the slopes. By following this guide‚ you’ll find the ideal helmet for your next snowboarding adventure.

Final Tips for a Safe and Comfortable Fit

To ensure a safe and comfortable fit‚ always test your helmet with goggles to confirm compatibility. Adjust the fit system for a snug feel‚ and check for even pressure distribution. Avoid ignoring proper sizing for style‚ as safety should always come first. Consider layering adjustments for seasonal changes‚ and clean your helmet regularly to maintain hygiene. If your helmet feels too tight or loose after extended use‚ it may be time to replace it. Trust your comfort instincts—proper fit enhances safety and performance on the slopes. Refer back to this guide for any sizing or fit concerns.

Additional Resources for Further Reading

For deeper insights‚ explore articles on ski and snowboard helmet construction and advanced fit technologies. Visit manufacturer websites for detailed sizing charts and care tips. Check out reviews from trusted sources like Outdoor Gear Lab or REI for real-user feedback. Additionally‚ safety organizations such as ASTM and Snell provide standards for helmet certification. Reading these resources will help you make an informed decision and stay updated on the latest trends in snowboarding safety. Bookmark these guides for future reference as you continue your search for the perfect helmet.

garrett metal detector ace 250 owners manual

The Garrett Ace 250 is a versatile and enhanced metal detector designed for both beginners and experienced users. It features advanced Target ID technology, multiple search modes, and a battery condition indicator for optimal performance. Known for its ease of use and depth capabilities, the Ace 250 is a popular choice among treasure hunters and hobbyists. The comprehensive owner’s manual provides detailed instructions for assembly, operation, and maintenance, ensuring users maximize their detecting experience.

1.1 Overview of the Ace 250 Model

The Garrett Ace 250 is an enhanced metal detector designed for versatility and ease of use. It features advanced Target ID technology, five search modes, and a battery condition indicator. Lightweight and durable, the Ace 250 is suitable for both beginners and professionals; With no tools required for assembly and powered by four AA batteries, it offers a user-friendly experience for treasure hunting and relic recovery.

1.2 Importance of the Owner’s Manual

The owner’s manual is essential for understanding the Garrett Ace 250’s features, operation, and maintenance. It provides detailed instructions for assembly, battery installation, and troubleshooting. The manual also explains how to use advanced features like Target ID and search modes effectively. Reading it thoroughly ensures users can optimize performance, resolve issues, and maximize their metal detecting experience with the Ace 250.

Key Features of the Garrett Ace 250

Target ID, multiple search modes, and a battery condition indicator make the Garrett Ace 250 user-friendly and versatile, suitable for various metal detecting scenarios with its LCD display.

2.1 Power Button Functionality

The Power button on the Garrett Ace 250 serves dual purposes. Pressing and holding it for 5-10 seconds resets the detector to factory settings, while a simple press cycles through its operating modes. This feature ensures quick adjustments and maintains optimal performance. The button’s functionality is straightforward, making it easy for users to navigate and customize their metal detecting experience effectively.

2.2 Target ID Technology

The Garrett Ace 250 features advanced Target ID technology, which provides a numerical display of a target’s conductivity. This helps differentiate between trash and valuable items, such as coins or jewelry, improving detection accuracy. The technology enhances the detector’s ability to identify targets accurately, allowing users to make informed decisions about digging, thus optimizing their metal detecting experience and efficiency.

2.3 Search Modes and Discrimination Settings

The Garrett Ace 250 offers five distinct search modes: All-Metal, Coins, Relics, Custom, and Zero. These modes allow users to tailor their detection experience to specific targets or environments. The discrimination settings enable filtering out unwanted items like trash, enhancing the detector’s accuracy. By adjusting these settings, users can optimize performance for different scenarios, ensuring a more efficient and enjoyable metal detecting experience.

2.4 Battery Condition Indicator

The Garrett Ace 250 features a battery condition indicator, ensuring users are aware of remaining power. The LCD display continuously shows the battery level, preventing unexpected shutdowns. This feature helps users monitor and replace batteries as needed, maintaining optimal performance during metal detecting sessions. The indicator is straightforward to read, providing peace of mind and ensuring uninterrupted exploration.

Assembly and Battery Installation

Assembly of the Garrett Ace 250 requires no tools and is straightforward. Four AA batteries are included, ensuring quick setup. Battery installation is simple, with clear instructions provided in the manual for hassle-free preparation.

3.1 Steps to Assemble the Detector

Assembling the Garrett Ace 250 is straightforward and requires no tools. Start by attaching the search coil to the lower stem, ensuring a secure connection. Next, insert the four included AA batteries into the control box, following the polarity guide. Finally, snap the battery cover back into place and perform a quick test to ensure the detector powers on and functions correctly.

3.2 Battery Requirements and Installation

The Garrett Ace 250 requires four AA batteries for operation, which are included with the detector. To install, locate the battery compartment on the control box and slide the cover off. Insert the batteries following the polarity guide marked inside the compartment. Replace the cover securely. No tools are needed for this process, ensuring quick and easy battery installation.

Understanding the Control Panel

The control panel of the Garrett Ace 250 features a power button, mode button, sensitivity controls, and a battery condition indicator. These components work together to provide easy operation and customization of the detector’s settings, ensuring users can optimize their metal detecting experience with intuitive controls.

4.1 Power Button and Factory Reset

The power button on the Garrett Ace 250 serves dual functions: it turns the detector on/off and resets it to factory settings. Pressing and holding the button for 5-10 seconds initiates a factory reset, restoring default settings. The button also switches the detector off when pressed and released quickly. This feature ensures easy operation and troubleshooting, making it convenient for users to revert to default configurations when needed.

4.2 Mode Button and Search Modes

The Mode button allows users to cycle through the Garrett Ace 250’s five search modes: All-Metal, Coins, Relics, Custom, and Zero. Each mode is designed for specific detecting scenarios, with varying discrimination settings. Pressing the Mode button toggles between these options, enabling users to tailor their search to different targets and environments efficiently. The current mode is displayed on the control panel for easy reference.

4.3 Sensitivity and Discrimination Controls

The Garrett Ace 250 features adjustable sensitivity and discrimination controls, allowing users to fine-tune performance. The sensitivity control adjusts the detector’s depth and accuracy, while the discrimination control filters out unwanted targets like trash. These settings ensure optimal detection by minimizing false signals and maximizing target identification. The control panel provides clear indicators for easy adjustment, enabling users to customize their metal detecting experience effectively.

Search Modes and Settings

The Garrett Ace 250 offers multiple search modes, including All-Metal, Coins, Relics, Custom, and Zero modes, each tailored for specific detecting scenarios and target types.

5.1 All-Metal Mode

The All-Metal Mode on the Garrett Ace 250 detects all types of metal objects without discrimination, making it ideal for general treasure hunting. This mode maximizes sensitivity, allowing users to locate ferrous and non-ferrous targets, including small items like coins or larger relics. It’s perfect for beginners and experienced users seeking a broad detection capability. The mode ensures no potential treasures are missed, providing an excellent starting point for exploration.

5.2 Coins Mode

The Coins Mode on the Garrett Ace 250 is specifically designed for detecting coins and small metallic objects. It uses Target ID technology to identify potential finds while filtering out unwanted trash. This mode is ideal for hobbyists and collectors, offering precise discrimination settings to enhance coin hunting efficiency. Its ease of use and focus on small targets make it a favorite among metal detecting enthusiasts.

5.3 Relics Mode

The Relics Mode on the Garrett Ace 250 is tailored for detecting older, historically significant items. It offers deeper penetration and specialized settings to locate relics buried over time. This mode minimizes interference from modern trash, making it ideal for historical sites. Its advanced discrimination helps preserve the integrity of finds, appealing to relic hunters and history enthusiasts seeking to uncover the past with precision and ease.

5.4 Custom Mode

The Custom Mode on the Garrett Ace 250 allows users to tailor detection settings to their specific needs. By adjusting discrimination patterns and sensitivity, hunters can optimize performance for particular environments or target types. This mode combines the flexibility of user-defined preferences with the detector’s advanced technology, enabling precise and efficient searching in diverse conditions. It’s ideal for experienced users seeking personalized detection capabilities.

5.5 Zero Mode

The Zero Mode on the Garrett Ace 250 resets the detector to its base settings, eliminating any user adjustments. This mode is ideal for starting fresh or recalibrating the device. It ensures consistent performance by reverting to factory defaults, making it a useful feature for both beginners and experienced users seeking a reliable baseline for their metal detecting adventures.

Adjusting Depth and Sensitivity

The Garrett Ace 250 allows users to fine-tune sensitivity and depth settings for optimal performance. Adjustments ensure accurate target detection, enhancing the metal detecting experience.

6.1 Depth Indicator and Coin Depth Adjustment

The Garrett Ace 250 features a depth indicator to estimate target depth, aiding in accurate detection. Adjusting the coin depth setting optimizes sensitivity for small objects, improving detection accuracy. This feature enhances the ability to locate coins and relics at varying depths, ensuring effective metal detecting experiences in diverse environments.

6.2 Sensitivity Settings for Optimal Performance

Adjusting the sensitivity on the Garrett Ace 250 ensures optimal detection by minimizing false signals. Higher sensitivity enhances depth but may increase interference. Lower settings reduce noise in mineralized soil. Proper adjustment balances performance and accuracy, allowing effective detection in various environments. Regular tuning ensures the detector operates at peak efficiency, maximizing your metal detecting success.

Maintenance and Care

Regular cleaning and proper storage extend the life of your Garrett Ace 250. Inspect and update the detector as needed to ensure optimal performance and longevity.

7.1 Cleaning and Storage Tips

Regularly clean the Garrett Ace 250 with a soft cloth to remove dirt and moisture. Avoid harsh chemicals or abrasive materials that may damage the finish. Store the detector in a cool, dry place, away from direct sunlight. Use a protective cover to prevent dust accumulation. Check for wear and tear on cables and coils, and ensure all parts are secure before storage. Proper care ensures longevity and optimal performance.

7.2 Regular Checks and Updates

Perform regular checks on the control panel, battery level, and search coils to ensure optimal performance. Inspect cables and connections for damage or wear. Clean the search coil and cables to prevent dirt buildup. Check for firmware updates or adjustments to maintain accuracy. Refer to the owner’s manual for detailed guidance on performing these checks and updates to keep your Ace 250 functioning at its best.

Troubleshooting Common Issues

Troubleshooting the Garrett Ace 250 involves addressing battery-related problems, depth and sensitivity issues, and false signals. Refer to the manual for step-by-step solutions to ensure optimal performance.

8.1 Resolving Battery-Related Problems

The Garrett Ace 250’s battery-related issues can be resolved by checking the battery condition indicator on the LCD display. Low battery levels can cause poor performance. Replace AA batteries when the indicator shows low power. Ensure batteries are installed correctly, with proper polarity, to avoid damage. If issues persist, clean the battery contacts and connections. Refer to the manual for detailed troubleshooting steps to maintain optimal functionality.

8.2 Addressing Depth and Sensitivity Issues

If the Garrett Ace 250 is not detecting targets at expected depths, check the sensitivity settings and ensure they are adjusted appropriately for the environment. Low sensitivity may reduce detection depth, while high sensitivity can cause false signals. Use the coin depth indicator to gauge performance. Ensure the search coil is aligned and undamaged. Refer to the manual for calibration and adjustment guidance to optimize detection accuracy and depth.

8.3 Fixing False Signals and Interference

False signals on the Garrett Ace 250 can occur due to electromagnetic interference or incorrect sensitivity settings. To resolve this, adjust the discrimination settings to ignore unwanted targets like trash. Ensure the detector is properly grounded and avoid use near power lines or electronic devices. Check for coil damage and clean the search area. Refer to the manual for calibration steps to minimize interference and improve detection accuracy.

Accessories for the Ace 250

The Garrett Ace 250 can be enhanced with optional accessories like specialized headphones and interchangeable search coils. These accessories improve functionality and detection accuracy.

9.1 Recommended Headphones

Recommended headphones for the Garrett Ace 250 include the ACE Sport Phones (part number 1612400), designed to enhance audio quality and reduce external noise. These headphones are lightweight, durable, and provide clear target signals, improving detection accuracy; They connect easily to the detector’s headphone jack, ensuring uninterrupted use during searches. Using these headphones is essential for optimizing the detector’s performance in various environments.

9.2 Optional Search Coils and Attachments

Optional search coils and attachments enhance the Garrett Ace 250’s versatility. Additional coils, such as smaller or larger sizes, improve depth and sensitivity in various terrains. Attachments like lower rods or specialized mounts can customize the detector for specific needs. These accessories optimize performance for different environments, ensuring better results in diverse detecting scenarios and conditions.

The Garrett Ace 250 is a reliable, versatile metal detector ideal for both beginners and experienced users. With proper use and maintenance, it delivers excellent performance, helping you uncover hidden treasures and enjoy metal detecting adventures with confidence and success.

10.1 Final Tips for Effective Use

For optimal performance, regularly clean the search coil and store the detector in a dry place. Adjust sensitivity and discrimination settings based on terrain to minimize false signals. Use high-quality headphones to enhance audio cues. Familiarize yourself with the owner’s manual to explore all features. Practice in different environments to improve your skills and maximize your metal detecting adventures with the Garrett Ace 250.